 If you've ever been disappointed with the results of your flower
photos, it probably has little to do with the subjects themselves. Most likely,
the culprit lies in the background. Many great flower portraits are ruined by
any number of distracting elements that can show up in the background.
Sometimes, all it takes is a change in perspective to isolate the subject. One
of the best options is to place the flower in front of a darkened environment.
However, this may be easier said than done if everything surrounding you is
bathed in bright sunlight. In cases like these, a simple black cloth is all it
takes to solve this problem. A 3X3 foot piece of black fabric is a permanent
resident in my camera bag. I can either place it on the ground under a flower,
or behind it by draping it over my camera bag to create a ready-made black
background wherever I need one.
 With the flower completely isolated and free of distractions, it now takes center stage and commands the viewer's total attention. Of course, with this much black in the background, great care must be taken to avoid an overexposure. I spot meter the flower, whereby, it's the only thing taken into consideration when determining the exposure. If you don't have a spot meter, just physically move the camera closer so that the flower fills the frame and then take a manual reading. Recompose the shot and take the photo with this reading.
By eliminating the background, I have a virtual "clean slate" with which to work. This opens the door to a bevy of creative techniques to enhance your subject. All of these methods require the use of a tripod. One thing that works very well is a soft-focus double exposure technique, where one image is shot in focus and the other one completely out of focus. The expansion of the out of focus image creates a distinctive "glow" around the flower, giving it a romantic – almost ethereal quality. The lilies are an example of this technique.
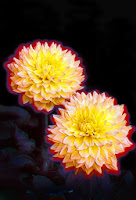
 I can even add a color to the glow by using special effect
filters. I use a Cokin polarizer in conjunction with a vari-color polarizer
filter to create a super-intense color around the flower. To further intensify
it, I’ll use fill-flash with its output set to +1. A red color was used in the
photo of the yellow dahlias. I place the filters in a special filter holder and
hand-hold it in front of the lens. If the holder’s attached, the few
ounces it weighs is enough to shift the position of the lens – producing a glow
that’s slightly out of register. If the winds are calm and I'm feeling
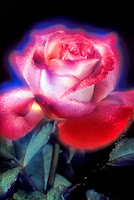
ambitious, I'll do a triple exposure where the flower is surrounded by
two different colored glows, as seen in the rose image. This is a fairly
complex technique that requires the flash to be set at varying output levels
for each shot to control the intensity of the colors. Feel free to contact me
at starcollec@aol.com for a more detailed explanation.
All of these images were shot outdoors in real-world conditions.
However, with proper lighting, it’s just as easy to buy some flowers and shoot
them indoors. In fact, with obstacles like wind and less than perfect specimens
removed from the equation, indoor shoots are much easier.
They say everything looks better in black, and that certainly applies here. A black background will give your flower portraits an air of elegance that's hard to match in any other setting.
They say everything looks better in black, and that certainly applies here. A black background will give your flower portraits an air of elegance that's hard to match in any other setting.
Submitted by:
F.M. Kearney is a fine art nature photographer, specializing in unique floral and landscape images. To see more of his work, please visit www.starlitecollection.com.
F.M. Kearney is a fine art nature photographer, specializing in unique floral and landscape images. To see more of his work, please visit www.starlitecollection.com.


No comments:
Post a Comment