Wednesday, August 28, 2013

A Day at the Beach by F.M. Kearney


Sometimes, I'll come across a scene that's so picturesque, it almost seems as though there's little more to do than "point and shoot." Of course, it's never quite that easy.

I was recently in Antigua, West Indies, photographing the seascape of Dickenson Bay. Located on the northwestern coast of the country, Dickenson Bay is a beach known for its calm seas and white sand. On this particular day, it was further enhanced by a magnificent sky filled with puffy, cumulus clouds.
A seascape on its own can look somewhat boring without a little help. It’s always good to anchor it with an interesting foreground element. In the Caribbean, palm trees are probably the most clichéd subjects of choice. However, I decided to use parts of the shoreline in one photo, and a rock jetty adorned with a lone seagull in the other. I lowered the height of my tripod-mounted camera to place the horizon just above the seagull's head.
The most invaluable piece of equipment is a polarizer filter. The effect of this filter is unique – an effect that (as of yet) cannot be digitally duplicated. Simply by rotating it, you can remove polarized light from an image, resulting in a reduction of reflections and glare, and an increase in color saturation. This effect is most pronounced on a blue sky. For these images, I used colored polarizer filters – providing all of the aforementioned effects, as well as an enhanced color scheme. I used a blue/yellow polarizer for the shoreline photo to emphasize the blue in the sky and to add a warm tone to the sand. The rock jetty image was better suited to a blue/red polarizer. It enabled me to saturate the color of the sky, while improving the color of the rocks. I have other colored polarizers, but these two produce the most realistic-looking effects.
 

Probably, the most important thing to keep in mind when shooting seascapes is the horizon line. It's absolutely imperative to keep it straight. If you're shooting a busy forest scene or mountain vista, it may not be too noticeable if the shot is a little off-kilter. But, seascapes have a very distinct horizon, and even the slightest slant will throw the entire image off. There are a number of ways to ensure a straight line. My camera has interchangeable focusing screens. I can replace the normal split-screen with a grid screen which will overlay the scene in the viewfinder with a series of horizontal and vertical lines. To do this, I need to remove the top of the camera and manually insert the screen. Some of the newer cameras today have virtual horizon lines that can be activated with the simple push of a button. Any of these methods are much more accurate than trying to use your naked eyes to line up the horizon.
When nature serves up a virtual  "perfect picture on a platter," it always take a bit of effort to successfully capture in 2D what you witnessed in 3D.

Submitted by:
F.M. Kearney is a fine art nature photographer, specializing in unique floral and landscape images. To see more of his work, please visit www.starlitecollection.com.

Wednesday, August 21, 2013

CREATIVE FLOWER PHOTOGRAPHY Tip #7: Blackout the Background


If you've ever been disappointed with the results of your flower photos, it probably has little to do with the subjects themselves. Most likely, the culprit lies in the background. Many great flower portraits are ruined by any number of distracting elements that can show up in the background. Sometimes, all it takes is a change in perspective to isolate the subject. One of the best options is to place the flower in front of a darkened environment. However, this may be easier said than done if everything surrounding you is bathed in bright sunlight. In cases like these, a simple black cloth is all it takes to solve this problem. A 3X3 foot piece of black fabric is a permanent resident in my camera bag. I can either place it on the ground under a flower, or behind it by draping it over my camera bag to create a ready-made black background wherever I need one.

With the flower completely isolated and free of distractions, it now takes center stage and commands the viewer's total attention. Of course, with this much black in the background, great care must be taken to avoid an overexposure. I spot meter the flower, whereby, it's the only thing taken into consideration when determining the exposure. If you don't have a spot meter, just physically move the camera closer so that the flower fills the frame and then take a manual reading. Recompose the shot and take the photo with this reading.

By eliminating the background, I have a virtual "clean slate" with which to work. This opens the door to a bevy of creative techniques to enhance your subject. All of these methods require the use of a tripod. One thing that works very well is a soft-focus double exposure technique, where one image is shot in focus and the other one completely out of focus. The expansion of the out of focus image creates a distinctive "glow" around the flower, giving it a romantic – almost ethereal quality. The lilies are an example of this technique.

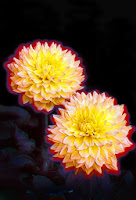
I can even add a color to the glow by using special effect filters. I use a Cokin polarizer in conjunction with a vari-color polarizer filter to create a super-intense color around the flower. To further intensify it, I’ll use fill-flash with its output set to +1. A red color was used in the photo of the yellow dahlias. I place the filters in a special filter holder and hand-hold it in front of the lens. If the holder’s attached, the few ounces it weighs is enough to shift the position of the lens – producing a glow that’s slightly out of register. If the winds are calm and I'm feeling ambitious, I'll do a triple exposure where the flower is surrounded by two different colored glows, as seen in the rose image. This is a fairly complex technique that requires the flash to be set at varying output levels for each shot to control the intensity of the colors. Feel free to contact me at starcollec@aol.com for a more detailed explanation.


All of these images were shot outdoors in real-world conditions. However, with proper lighting, it’s just as easy to buy some flowers and shoot them indoors. In fact, with obstacles like wind and less than perfect specimens removed from the equation, indoor shoots are much easier.

They say everything looks better in black, and that certainly applies here. A black background will give your flower portraits an air of elegance that's hard to match in any other setting.


Submitted by:
F.M. Kearney is a fine art nature photographer, specializing in unique floral and landscape images. To see more of his work, please visit
www.starlitecollection.com.

Friday, August 16, 2013

See What John Longbow is Creating!

 
Art Piece: 
“Something from Jean Michel Basquait”
Manipulated Photography
26”  x  30”
 
About the Artist
John Longbow
John Longbow, who resides in New Mexico, is a professional musician, Luthier “Guitar Maker” and Image Manipulator.   John has a BA in Music with a Minor in Industrial Manufacturing.  While in Mexico, John was taught to look at images beyond their traditional physical presence. 
 
John’s Personal Statement:
Through pictures, symbols and totems, I see the spirit of the images.  I then manipulate the image to speak what I see.  I hope these images stop you…and make you think differently.
 
To view more of John’s work and the work of all our fine artists, visit us at www.contemporaryartgalleryonline.com.   Also check out our monthly art competitions.


Wednesday, August 14, 2013

Waterlilies and Creative "Flare" by F.M. Kearney


Photographing waterlilies has its pros and cons. Unlike other flowers that are often surrounded by unsightly twigs, weeds and/or soil, waterlilies grow in the middle of lakes and ponds amidst decorative lily pads. With fewer distractions around them, it's much easier to compose a "clean" shot. The downside is that they grow in the middle of lakes and ponds. Unless you're willing and able to wade out to them for a close up, you will almost certainly need to use a zoom lens. Although all of the waterlilies I've ever shot were in the reflecting pools of botanical gardens, I still needed to use a long lens to obtain a tight composition.

The dark water that usually surrounds waterlilies provides opportunities for creative possibilities. It can be filled with the reflections of the flowers themselves, or with special effects. I used Cokin diffractor filters to create the multi-colored flares in these images I shot in the Brooklyn Botanic Garden. A diffractor filter works by producing colorful design patterns around bright light sources. Different variations of these filters produce different design patterns. Although there are no visible light sources in these photos, I composed them with the reflection of the sun on the water just outside the frame. These filters are very sensitive and were able to react merely off of the brilliance of the sun alone. I rotated the filters to place the designs in the exact spots I wanted them.

Diffractor filters may not be for everybody. In fact, they mimic an effect many photographers try to eliminate – sun flare. You certainly wouldn't want to use them if your goal is to capture an accurate documentation of something. I rarely use them myself because I've always considered their effects to be somewhat hokey. However, if the light source is completely omitted from the shot, as in these two particular images, they can be used much more creatively since the cause of their effects is not immediately evident. If you're in the mood for something different, diffractor filters are a fun way to add an artistic “flare” to your photos.


Article Submitted By:
F.M. Kearney is a fine art nature photographer, specializing in unique floral and landscape images. To see more of his work, please visit www.starlitecollection.com.

Monday, August 12, 2013

See What Alvaro García Ordoñez is Creating!

 
Art Piece: 
“Wind I”
Mixed Media
51”  x  33”
 
About the Artist
Alvaro García Ordoñez
Alvaro García Ordoñez the son of a carpenter and a teacher was born in the town of La Peña, Cundinamarca province, Colombia. 
He studied at the Art School in the National University of Colombia in Bogotá. After graduating he earned a scholarship that took him to Sweden, Germany, Switzerland and France.
Alvaro is a notable  Colombian sculptor and painter. 
Alvaro currently lives in the United States with a residence as Aliens of Extraordinary Ability and where he is making an ample cultural and societal contribution through his art.

 
To view more of Alvaro’s work and the work of all our fine artists, visit us at www.contemporaryartgalleryonline.com.   Also check out our monthly art competitions.

Friday, August 9, 2013

See What Toni Silber Delerive is Creating!


Art Piece: 
“Diamonds”
48” x 48” x 1.5”
Oil on Canvas
 
About the Artist
Toni Silber Delerive
Toni Silber Delerive studied painting at the Philadelphia College of Art and graphic design at the School of Visual Arts.  A Manhattan-based artist and graphic designer, Toni’s work is represented in museums, private and corporate collections.
Toni Silber Delerive’s  aerial-view paintings represent diverse places and spaces of the contemporary landscape seen from an above ground perspective. The flattened surface planes convey the textures of abstract space enhanced by compositional aesthetics and skillful use of color. From the elevated position of high-rise buildings and helicopters, my images of cities and towns, factories and farmlands, power plants, suburban communities and highways are delivered with a distinctive angle on structures frequently taken for granted.
Through the aerial vantage point one discovers a modern perspective and fresh visual vocabulary. The flattened plane reduces details to strong graphic images. Overall, Toni Silber Delerive strives to blend a fresh perspective with a savvy demonstration of the power of color and composition.
To view more of Toni’s work and the work of all our fine artists, visit us at www.contemporaryartgalleryonline.com.   Also check out our monthly art competitions.


Wednesday, August 7, 2013

The Magic Hours by F.M. Kearney

Most nature photographers know that the best light of the day occurs during the first and last hours of sunlight – sunrise and/or sunset. During this time, the sun is low on the horizon and its light travels through more of the atmosphere creating brilliant shades of red, yellow and gold. It’s for that reason photographers have always referred to this time of day as the magic (or golden) hours.

A few years ago, I was on Atlantic City Beach and was able to capture both “bookends” of the same day. In the morning, I shot the sun rising above the Atlantic Ocean. When shooting directly into the sun, it’s very easy to underexpose the photo if your camera is set to a standard automatic mode. Camera meters are very accurate, but there are several situations in which they can be fooled. Shooting toward a bright ight source such as the sun is one of those situations. Although you can see the entire scene clearly with your eyes, your meter is basically only “seeing” the overwhelming brightness of the sun. As a result, it will set an exposure that is much too dark for the image as a whole. A solution to this problem is to use a spot meter, which only measures the light in a tiny portion of the scene. Spot meters are standard in most modern cameras and are extremely useful. For this particular shot, I spot-metered a clear area of the sky next to the sun, then locked in that exposure and took the photo.
The sunset photo had the opposite problem. Since the image was comprised primarily of dark tones, a standard meter reading would have generated an overexposure.

Using the same technique for the sunset shot, I spot-metered the yellow area of the sky in the center of the frame. This method worked well for both images because the sky and the ground were fairly close in tone. However, had the contrast between the two been more extreme, special filters or exposure blending software would have been needed.

Shooting during the magic hours can definitely produce beautiful colors in your photos. Careful attention to exposure is necessary to insure that these colors remain true and strong. The images I shot that day were further enhanced by the presence of several feathered friends who seemed to enjoy being photographed. In the morning, I had to reposition my tripod after almost shot as I followed these two seagulls along the beach. I was joined by an even larger group of birds later that evening. Seconds after I took my last photo they all flew away.

The warm tones of magic hour photos can be a bit deceiving – suggesting that they were taken on a hot day in the summer. The photos I took in Atlantic City were shot in the dead of winter on a cold day in February.


Article Submitted by:
F.M. Kearney is a fine art nature photographer, specializing in unique floral and landscape images. To see more of his work, please visit www.starlitecollection.com.
Tuesday, August 6, 2013

The New Race by Jayme Catalano


San Francisco artist Dave Young V explores a militarized, anarchist, post-apocalyptic future in his large format paintings, drawings, and three dimensional works.  In addition to the graphic pen and ink drawings he is known for, he re-appropriates elements for the three-dimensional works including automatic rifles, helmets, a fully-functional flame thrower, ammo boxes and even a full-size automobile (a collaboration with artist Eddie Colla).  Young V says that the name of his upcoming exhibition, “The New Race,” is “more of an implication to allow the viewer’s mind to wander into the possibilities of not only where we may be going as a society or culture but also as a species.  My work as always worked on the loose premise of a ‘post-apocalyptic’ world.  Each installment thus far has been an exploration of people, languages and aesthetic of that world.  ‘The New Race’ will continue in that vein, only stepping further into the implications of genetic engineering, cloning, human reproduction, the biological fusion of technology as a natural part of our evolution, and question notions of racial and cultural identity in
this new hypothetical world.”  The exhibition opens at the White Walls Gallery in San Francisco on Saturday, January 12th and continues through February 2nd.  You can find more information about the artist here and at the gallery website.

Article Submitted by:
-Jayme Catalano
Jayme Catalano Graphic  and Web Design
Jayme@jaymecatalano.com
Jayme specializes in graphic and web design with an emphasis on original, creative content to maximize visual impact.

Monday, August 5, 2013

See What Edwardo Setien is Creating!

 
Art Piece: 
“New DNA Creation #1”
Pastels on Paper
24”  x  19”
About the Artist
Edwardo Setien
Edwardo works in different mediums and uses multiple techniques.   He prefers the combinations of pastels and ink on paper, oil on canvas, and  Mixed Medias on wood.  Edwardo has been painting and selling his work for over 20 years.  He has shown in multiple arenas and won numerous prizes.
Edwardo says painting is freeing.  He can communicate more of his feelings and in a shorter period of time, especially if the inspiration is strong.  Edwardo still writes poetry.  However; his passion is painting.
To view more of Edwardo’s work and the work of all our fine artists, visit us at www.contemporaryartgalleryonline.com.   Also check out our monthly art competitions.


Friday, August 2, 2013

See What Robert Andes is Creating!


Art Piece: 
“Paris Lunch”
Oil
 
About the Artist:
Robert Andes
Robert is a colorist first and foremost.  He is fascinated with the interaction of color and its temperature. Robert says he finds it fascinating that we perceive reflected light as color.  Robert further states that art is an illusion that both the viewer and he create.  Robert makes work that plays with depth perception and emotion; this allows him to capture an inner monologue.  He abstracts some areas and paints others more representational or true to form.  Robert creates an interactive piece of art; the eye is confused by color, depth, and of the hidden emotion of the subject.
Robert teaches art at Northwest Arkansas Community College.
 To view more of Robert’s work and the work of all our fine artists, visit us at www.contemporaryartgalleryonline.com.   Also check out our monthly art competitions.