

Several years ago, while standing in line at a camera store,
I began thumbing through the pages of a book about photographing flowers. I
came across a section showing a studio set-up of a single rose wrapped in blue
tissue paper in a cone-like fashion. The finished photograph was a close-up of
the rose with a decorative blue background.
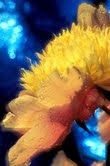
Since my “studio” is the Great Outdoors, I thought of ways I could employ this technique in the field. Most of my flower shots are done in botanical gardens. Since the groundskeepers probably wouldn’t appreciate having their blooms wrapped up like FTD bouquets, I decided to place the paper on the ground behind the flower. This, in fact, worked out much better. Due to the close proximity between the paper and the flower in the book illustration, you could clearly see that the material was tissue. In my improvised version, with the paper several feet away, it became nothing more than a soft color wash.

If you want to take it a step further, try using Mylar
paper. Mylar is a highly reflective material, often used as an elegant gift box
liner. When crumpled up and reopened, its wrinkles reflect light like a
glistening, crystal chandelier. The effect is most pronounced in direct
sunlight. For a multi-colored effect, I've created customized backgrounds
comprised of several randomly-sized and colored pieces of both types of papers.
I glue them to 3X3 square foot pieces of cloth that can be easily rolled or folded
to fit almost anywhere.
For best results, I use each type of paper in only certain types of light. Tissue paper works best in the shade or on overcast days, but Mylar does its best work in direct sunlight. If it’s used in any other type of light, no highlights will appear at all. This can be a real headache if you’re shooting on a partly sunny day – when the sun is constantly playing “peek-a-boo” behind the clouds. There can be, however, too much of a good thing. Large concentrations of highlights can produce distracting “hot spots.” If that happens, I simply smooth out the paper to reduce some of its reflective surfaces.

It’s important to keep in mind that you’re just dealing with
the background. These stunning effects can very easily dominate the photo, and
draw attention away from the real subject. If you’re not careful, they can even
become downright distracting. I come in very close on the flower, so that the
background covers little more than the outer fringes of the frame – using
extension tubes for greater magnification if necessary.
 You can also top off these effects by using a soft-focus
double exposure technique, whereby, one image is shot in focus and the other
one is completely out of focus to create a dreamy, romantic look. If the background
is a little too close to the flower and in danger of being recognized as paper,
this will definitely blur it to the point where its mystique remains intact.
Lastly, for best results, you should use a lens with a focal length of at least
200mm or more. You won’t get the degree of softness you need with anything
shorter, and the effect will look more like a mistake (as though you bumped the
camera during the exposure) than a deliberate attempt to soften the image.
You can also top off these effects by using a soft-focus
double exposure technique, whereby, one image is shot in focus and the other
one is completely out of focus to create a dreamy, romantic look. If the background
is a little too close to the flower and in danger of being recognized as paper,
this will definitely blur it to the point where its mystique remains intact.
Lastly, for best results, you should use a lens with a focal length of at least
200mm or more. You won’t get the degree of softness you need with anything
shorter, and the effect will look more like a mistake (as though you bumped the
camera during the exposure) than a deliberate attempt to soften the image.
These techniques will help to transform your flower images
into what I like to refer to as, “Fantasy Florals.”
Article Submitted by:
F.M. Kearney is a fine art nature photographer,
specializing in unique floral and landscape images. To see more of his work,
please visit www.starlitecollection.com.
No comments:
Post a Comment